Video Editing With Blender
Update 2012-11-11: This tutorial is written for Blender 2.49b[a], not for the current version, which is 2.64a. I'm working on an update, as 2.64a is much better when it comes to video editing than 2.49b.
Going from still image photography to videography was quite a shock for me. Suddenly, my existing post-processing workflow neither worked nor flowed any more. Truth is, I have never been much for the post-processing phase of photography. The fun part is being out there, taking pictures, and my rule of thumb is that if it takes more than two minutes to edit a photo, then something's gone horribly wrong. With video, two minutes is about the time it takes to get started with the editing. On top of that, video is something that usually requires more editing than stills. Since a photo is just a frozen moment in time, you can accept or reject it as one unit - if it looks good then keep it, if it looks bad then discard it. A video clip may have interesting and non-interesting parts, and may have to be set in a context in order to make sense.
I realized that if I were going to be able to keep up any kind of interest for shooting video, I had to get myself into a routine that would enable me to spend minimum time editing video and maximum time shooting.
-
The first point of that routine was to eschew major productions. My videos would be short, 10-20 second clips. That way, I wouldn't have to build a complex narrative and could show them more or less in isolation as "pretty moving pictures", similar to the "pretty pictures" that I intend for the stills to be.
-
The second point was to create a workflow that enabled me to go from a set of raw clips to a finished, publishable clip in a minimum of time.
-
The third point was to limit myself to light edits. When it comes to media editing there is really no limit to how much you can do. If I was ever going to be able to actually get to the "publish" step, I had to set quite a strict limit to the kind of editing I would do.
1. Introduction
Just about every phone, compact camera and DSLRs released today has the ability to record movies, but recording is only half the job. If you intend to actually communicate anything, the footage must be edited to better reflect this. It is also rarely the case that we manage to capture nothing but interesting footage, so all the boring parts must be cut out. Finally, if we wish to communicate not just raw data but to dress the raw footage in mood, we must also color grade and use various techniques to emphasize certain aspects of the clip.
1.1. Choosing an Editor
There are many free non-linear video editing[b] programs out there:
There are also a multitude of small video editing apps available for just about any platform. All of them have the ability to take a set of movie clips and rearrange, cut and splice them together into a narrative.
1.1.1. Why Blender
Blender has one feature that raises it above the competition: The compositor, or "Node Editor". It allows you to set up a sequence of compositing nodes, similar to a sequence of filters, and then send your movie clip through them. This is best illustrated with a picture:
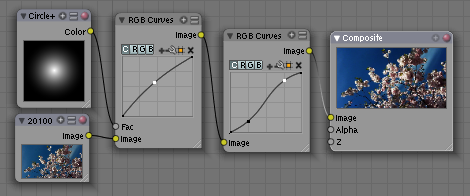
The movie clip on the bottom left is first brightened and then given increased contrast before finally being output. The top left node specifies where the brightening operation is applied to the movie. In this case, it is to the center of the image with an elliptic falloff toward the corners.
Since the camera I use (a Panasonic DMC-TZ7) has very limited picture controls, having the ability to crank the colors any which way is a necessity if I'm ever going to get a proper color grading - and Blender's compositor is exactly the way to get it.
1.2. Legalities
Before getting into the actual business of producing videos it is good to know a little about two types of licensing: The licensing of the video you are about to produce (your final output), and the licensing of any components of the video (your inputs).
Most video formats come with a host of patents attached, and my favorite codec, H.264, comes with a lot. If you, like me, choose to use H.264 anywhere in your workflow, you may run afoul of some of H.264's licensing terms. A good article that outlines the potential pitfalls is Know Your Rights: H.264, patent licensing, and you[g], by Engadget's Nilay Patel. For the lazy, the gist of the article is that as long as you don't distribute H.264 encoded movies to viewers, you can ignore any H.264 patents. If, however, you either write an H.264 codec or distribute H.264 encoded video, you should make sure that you comply with the H.264 license.
Unlike still photography, videos more or less require sound in order to provide an immersive experience. Unless you are also a musician, you might want to check Jamendo[h] or any other online music site for tracks that you may use for free. Some of the tracks can be used both commercially and non-commercially - be sure to read and understand the license before you decide to use any media you find.
2. Software
Programs I use:
3. Workflow
Roughly the workflow is this:
-
Shoot: Get the raw material.
-
Organize: Get the raw material onto the workstation.
-
Import: Get the clips into Blender.
-
Assemble: Cut and splice the clips together.
-
Edit: Make it look good and consistent.
-
Render: Time to hit the ANIM button and grab some coffee while the final product gets rendered and encoded.
-
Distribute: Get the video in front of the viewers.
3.1. Formats
When dealing with video there are two kinds of formats - intermediate and delivery. The difference is that the intermediate format is primarily easy to work with, whereas the delivery format is easy to distribute. The intermediate format is adapted to the tools, while the delivery format is adapted to the target device and the target content distribution network. For example: The intermediate format can be 1080p with a high bitrate, and the delivery format be optimized for mobile devices - 240p and a very low bitrate. Another example: When encoding video, there's the concept of "intra" frames. These are frames that can be used when seeking in a video stream. It is possible to grab any frame in a video stream, but you must first grab the nearest intra frame and then go frame-by-frame from there. An intermediate format can be all intra frames. No forward- or bidirectionally predicted frames. A delivery format can have one intra frame every five seconds, since the predicted frames take up much less space. The result is that the intermediate format is really easy and snappy to work with in a video editor, since you can jump around the clip with ease, while the delivery format is much more compact and cheaper to transmit.[1]
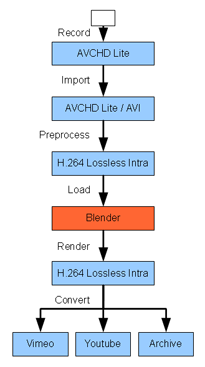
The formats used in each step of the workflow differ, but I try to minimize the number. I use H.264 lossless as an intermediate format. Support for it is good, and while it produces gargantuan files, I only have to keep those files during the actual time I'm editing. As the diagram to the right shows, the plan is to do all editing in a lossless intermediate format and then take the final output and convert it into the final delivery format.
The side effect of this is that a lot of disk is used during editing. For a three-minute production I usually end up with about 5 GB of preprocessed video and 2 GB of final output. This is then compressed to a 500 MB H.264 high-quality file for archiving, and 100 MB of reduced-resolution video for this blog. More about this in the Archiving and Distribution sections.
4. Shoot
When shooting video, there are a number of up-front decisions that you must make. Some of them are purely technical and some require hard artistic decisions to be made.
4.1. Resolution
The first question to answer is what output format you expect to end up with. Here you have essentially three parameters: Number of pixels left to right, number of pixels top to bottom and number of pictures per second.
If you, like me, come from a procedural-computer graphics background, this may seem very backwards. Why should you have to decide on the target media right at the start? The answer is a combination of the fact that you don't have infinite storage and computing power, and the fact that movies are sequences of still images. The former has as consequence that the higher the resolution you shoot at, the harder it becomes to get anything done simply because everything you do will take more time. Copy the clip from the camera to your workstation? Slower. Make edits? Slower. Backups? Slower. Time from shooting to finished result to back out shooting some more? Longer. The latter is slightly more insidious: While the spatial resolution of video is high enough to make resampling possible without (in most cases) visible degradation, the temporal resolution of video is so low that you immediately end up with artifacts - and quite serious ones - when resampling. Another way of putting it is that while you rarely see an individual odd pixel in a frame, if we were to insert an individual odd frame in a clip you'd most likely see it.
Fortunately there are some standard choices available, so even if you tend to suffer from indecisiveness it won't be all that bad as there is a natural limit to the choices. As of writing this just about every camcorder or compact camera shoots in the resolutions known as 720p, 1080i or 1080p at frame rates of 24, 25, 30 or 60 fields per second. (Wikipedia has an excellent article explaining these terms: HDTV Notation[m].) There are many technical arguments over which format is "the best", but ultimately it comes down to which look you want for the frame rate and whether your camera really can deliver what it claims resolution-wise. For example, while my Panasonic TZ7 can record in 720p, the small image sensor and video encoder are already struggling to preserve the details of the scene. Stepping up to 1080 would increase the file size, but would most likely not result in any real gain in quality and most likely result in a huge loss in productivity for me as the larger movie files become more cumbersome to edit. For the frame rate you essentially have two settings - fast and slow. Slow is 24 fields per second, or as close as you can get to that number. This will give you the "film look", as most movies are shot at that rate.[2] Fast is, well, as fast as your camera will go. This is if you shoot sports.
Summary: First, check what your camera supports. Decide between 720 and 1080 based on testing both and seeing of the difference makes up for the extra hassle. Decide frame rate based on the subject.
4.2. Codec
There is really not much to say here. As I write this cameras support two formats: AVCHD and Motion JPEG. Use AVCHD and be done with it. The files are smaller and the quality better.
4.3. Look
Professional digital film cameras have the option of shooting "raw", meaning that the raw image sensor data can be captured, possibly losslessly, and then edited. Since all white-balancing, sharpening and general styling of the image is done with the raw data as input, having access to it means that the videographer can delay those decisions to the editing phase.
If you're reading this, you do not have a professional digital film camera, and you do not have the option of delaying those decisions. Some people advocate the "next best" option, which is to turn down saturation, contrast and sharpening in the camera in an attempt at getting the widest dynamic range possible out of the camera and thus capturing the most "raw" image data possible without actually being able to capture raw sensor data. The downside is that while you expand the dynamic range, due to the quantization inherent in digital capture you lose precision, something that can be very visible in areas with smooth gradients when you color grade the clip - especially due to the compression the clip has gone through[3].
The advice I can give is this: Try to get it as right as possible when shooting. There is no reason to "shoot flat" if you already know what look you want to end up with. If you don't know exactly what look you want, make an educated guess. If you can't guess, then shoot flat and learn from experience so you'll know what you want next time.
4.4. Notes: Story
I came from still-photography to videography. The single biggest difference I soon realized was that when shooting video you had to have a story. While I could create a reasonably-looking set of photos just by snapping away at pretty stuff, the same mode of operation didn't work with video, and I found myself ending up with a disjointed set of video snippets.
By "story", I don't mean that you have to actually tell a story - but the clips that make up the production should have some kind of connection that the viewer can follow. Examples:
-
Start with an establishing shot and then follow up with a close-up view of the object that you want to show.
-
Or, go the other way and show the object first, then use the overview shot to establish the context it appears in.
4.5. Notes: B-Roll
A tip is to shoot some "b-roll". This is filler footage that you can use to pad the final production and provide pacing. Examples of b-roll footage are: People entering and exting a building, shots of traffic, nature, etc.
4.6. Clip Length
If you are shooting lots of short clips of scenery, but want the viewer to have time to take in the view - make the clips at least four seconds. I tend to make them eight, which gives me two seconds for fade in and fade out on each end.
5. Organize
Get the clips off the camera. I just save them into a folder structure of YYYY/YYYYMM/YYYYMMDD and convert the MTS files to AVI, but without re-coding the video.

Then I take a quick pass through them with IMatch[o] and delete any clips that didn't come out right or that for any other reason just take up perfectly good HD space. I may also do a rough cut of some clips using Avidemux[p] set to "copy" mode. A warning though, that may or may not apply to your camera: My camera only produces P frames in the AVCHD mode, which makes exact cutting in copy mode impossible. Make sure you check the resulting trimmed file before deleting the original. If the whole clip is nothing but forward-predicted frames, the first few frames of the clip will be complete junk. The resulting clips are the originals and will be archived - with one exception: see immediately below.
5.1. Ingest
Sometimes it makes sense to do the preprocessing right at the point when the raw footage is taken off the camera. For example, when I shoot timelapses I do the speedup and preprocessing here. I then archive the processed clips. When I did the video City, I had to do this just to get the amount of data down to a manageable size. The original movies were 17 GB in total, after doing video stabilization and timelapse speedup on them, they were 2.5 GB, and that's encoded as H.264 lossless intra. Had I converted them to H.264 high-quality I would've cut that by a factor of five or so and gotten it all down to 500MB.
5.2. Converting to Lossless Intra
If your camera, like mine, has an aversion to intra frames[4] you may want to convert the clips to H.264 lossless intra before starting to edit them. I do this with a script that converts the clips and copies them into the working directory for the movie project. The resulting files are big (about 10MB / second), but as they are only to be used during the editing it is well worth it. Converting to intra is done in FFmpeg by setting the maximum group-of-pictures size to one with a -g 1 parameter:
ffmpeg -i clip.avi
    -vcodec libx264
    -fpre libx264-lossless_ultrafast.ffpreset
    -g 1
    -f avi
out.avi5.3. Preprocessing
I do all the image stabilization and other effects here as well. The important point is to put all the preprocessing in a script or similar. Since the resulting files (the lossless intra files) will only be kept while editing and not archived, I must be able to re-create them if I want to do any kind of re-editing of the final result at a future point in time.
6. Import
The basic idea is to color grade each clip in isolation and then mix them all together and add sound in a final stage.
I have a template Blender project that you can download here: video-editing-with-blender.blend[q]. I use it as a starting point for my projects.
-
Open the file and go to the compositor.
-
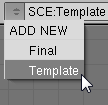
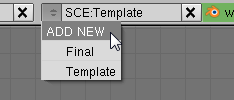
Then click on the scene selector and choose "Template".
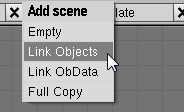
Click on the scene selector again and choose "ADD NEW", followed by "Link Objects".
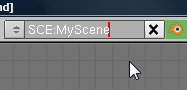
Rename the scene from "Template.001" to something that makes sense.
Click on "Load New" on the input node. Select the clip you want to import.

Select the clip in the image viewer. Press "N" to get the image information. Copy the number of frames to the input node's number of frames, and to the end frame number of the scene.[5]

Repeat the above for all clips you want to import. It is probably the most boring part of the whole process, but if it is any comfort - you'll spend more time waiting for the render.
6.1. Scene Organization
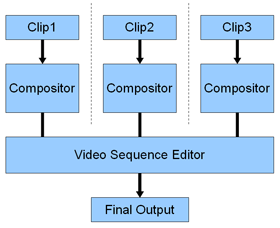
Blender has the concept of "scenes", which could be described as miniature Blender projects within the Blender project. For our purposes they work great - I create one scene for each clip and then a "Final" scene - so, for a project consisting of three clips I'd have "Clip1", "Clip2", "Clip3" and "Final". The Clip scenes would have "Do composite" selected, while the Final scene would have "Do Sequence" selected.
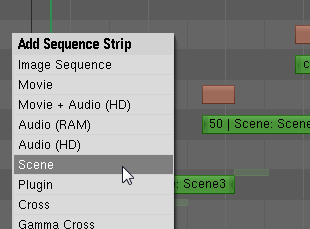
7. Assemble
With all clips imported, it is time to put it all together into a complete movie. This is done in Blender's Video Sequence Editor. Since we have stuck to the "one clip - one scene" way of organizing the clips, getting everything together is simply a case of hitting the space bar to bring up the VSE menu and choose Add, Scene, followed by the clip we want to add.
I usually work in a top-down manner - storyboarding everything before iteratively refining it. First, I get the background music if I intend for the result to be set to music. Then I roughly position the clips on the timeline. This is to see if the story works, and if the transitions between clips make sense. When that is done I proceed to fine-tune the transitions, add pans and zooms as needed, and color-grade the clips.
7.1. Music Synchronization
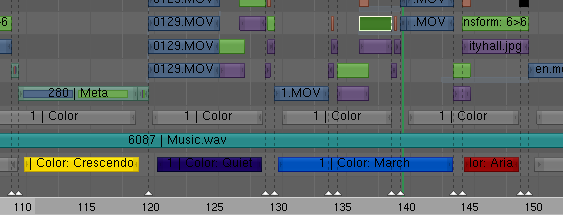
If you intend for the final production to be set to music, and want scene transitions to happen on certain points in the music, I highly recomment using the Color Generator strip type to briefly storyboard the movie before you add any clips. Create a color generator block for each clip - and make them different colors. Since it takes a lot less CPU to render the output of the color generator you can play the sequence back and move the blocks around until you see that the color transitions happen at the right moments. Once you have that done, simply replace the color generator strips with the actual movie clips. As you do that, consider keeping the color generator strips - for example, in channel 0 or 1, and adding your clips in channels 2 and higher. That way, if you ever have to go back and replace a clip, you don't lose the storyboard.
8. Edit
Once I'm happy with the story in the VSE, I switch to the compositor to color grade each clip, giving it the "look" that I want it to have. Usually, this means the following sequence of nodes:
-
The un-edited clip itself as input node.
-
An RGB Curves node with a texture node for masking. This is where I adjust the luminance of the shot, simulating a neutral density filter.
-
Another RGB Curves node, this time for coloring and contrast.
-
Finally, the output node.
If I want to do some serious color-bending, I'd use more than one node in step 3.
8.1. Masks
As the illustration above shows, one can use textures to limit the effect of a node on the output image. In the basic blender file, I have the following gradients (and their inverses) set up:
-
A vertical gradient.
-
A circular gradient.
-
Horizontal gradient.
-
A vertical bidirectional gradient that goes from black to white and back again.
-
A horizontal bidirectional gradient that goes from black to white and back again.
-
A vertical gradient where the transition is concentrated to the middle 20% of the frame.
Together they cover just about every single situation I come in contact with.
9. Render
Finally.
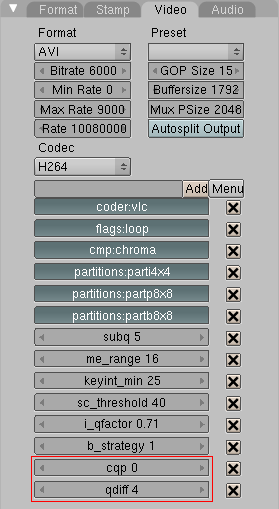
It sure took its time to get here, but at long last we're ready to produce the final output. When I render I tend to render to H.264 Intra Lossless and then convert into delivery formats from there. To get lossless H.264 you need to select FFmpeg output with the H.264 preset, and then add the parameter cqp: 0. If you use Blender 2.49 or 2.5a2 you also have to add qdiff: 4, or Blender will fail to initialize the codec.[6]
9.1. Archiving
As long as you save the Blender project and any preprocessing scripts you can re-render the movie at any time. Therefore, the archiving is mostly for convenience. Ideally you'd be able to archive the lossless H.264 file, but due to the huge files that encoding method tends to produce, you'll probably want to archive something smaller. I tend to archive the lossless if I can, or use ffmpeg to convert to x264-hq otherwise:
ffmpeg
    -i rendered.avi
    -f avi
    -vcodec libx264
    -fpre libx264-hq.ffpreset
    -b 25M
    -acodec copy
archived.avi10. Distribution
You can now take the lossless or archived video and recompress it for distribution. For video sharing sites, you just have to use the appropriate settings as detailed below. If you intend to make the movie streamable in a HTML5 video element, you should first read the Video on the Web[s] chapter of Dive Into HTML5[t], for an overview of the formats (yes, that's more than one) you need to convert the movie into to make sure it plays in all browsers.
10.1. Vimeo
For distribution to Vimeo[u], use the following ffmpeg command line, based on Vimeo's Compression Guidelines[v]:
ffmpeg
    -i rendered.avi
    -acodec aac
    -s 1280x720
    -vcodec libx264
    -fpre libx264-normal.ffpreset
    -b 14M
    -g 24
vimeo.avi10.2. Youtube
For distribution to Youtube[w], use the following ffmpeg command line:
ffmpeg
    -i rendered.avi
    -acodec libmp3lame
    -vcodec libx264
    -fpre libx264-normal.ffpreset
    -b 14M
    youtube.avi
The settings assume that you are distributing a 720p video. If not, you should reduce the bitrate appropritely.
10.3. Flowplayer
Flowplayer[x] is a free Flash video player. Convert the rendered movie using:
ffmpeg
    -i rendered.avi
    -ar 22050
    -b 4M
    -f flv
flash.flv10.4. WebM
WebM[y] is a new media format created by Google. It plays in the Chrome 6.0+[z] and Opera 10.6+[aa] web browsers, as well as in Apple's Safari[ab], if QuickTime plugins for the format has been installed. Use this command line:
ffmpeg
    -i rendered.avi
    -b 4M
    -f webm
out.webm10.5. Ogg Video
Ogg is a free media format, playable by Opera[ac], Chrome 6.0+[ad] and Firefox[ae]. Convert using:
ffmpeg
    -i rendered.avi
    -acodec libvorbis
    -vcodec libtheora
    -b 4M
out.ogv10.6. MP4 + AAC + H.264
MP4 + AAC + H.264 is the container and codec combination for Safari[af], iPhone (see the "TV and video" section) and Android[ag] devices. Convert your movie to this format using:
ffmpeg
    -strict experimental
    -acodec aac
    -vcodec libx264
    -fpre libx264-normal.ffpreset
    -b 4M
    out.mp4