The purpose of post-processing is to realize the artistic vision using the raw photographic data. Or just mess things up a bit.
Every photograph starts out with some kind of vision. That vision can range from a simple "that's cool, snapshot time!" to "if I shot a couple of long exposures here with a tele lens over a few hours, right around sunset, with a red sky, with that house in the center, I would be able to combine them into something really cool".
The photograph may not be formed, but the idea of it is already fully formed even before the shutter opens. What follows the creation of the idea is a capture process, where the camera and other equipment are used to capture relevant images.
The creative process, however, doesn't end when the capture process is completed. At the very least, we check if the image matches what we expected the camera to capture. For more complex visions, a more complex process may be required. Sometimes, one ends up considering ethical issues related to editing photos.
That is "post processing".
1. Overview
I prefer taking photos to editing them. Therefore I shoot JPEG, and do some very quick edits. The goal is to spend about a minute or two per photo. I use Adobe Photoshop CS5[a], but the steps below can be done in any image editor. For those on a budget, I'd recommend PhotoLine[b]. I've only briefly played with it, but I was able to do anything I normally do in Photoshop.
The first step is to decide what to do. I decompose the image into three aspects:
Subject: this is what you want to show. That which isn't background.
Focus: this is the most important bit of the subject, and the point where you want the observer's eyes to be drawn to first.
Direction: The "direction" of the image can be the axis along which the subject moves, or any kind of directionality in the subject itself.
The decomposition doesn't have to be slavishly followed - sometimes there is no subject/background distinction, point of focus or direction. But thinking about the photo in these terms can often help to bring out a strong photo from a so-so photo.
2. Preparation
The editing process starts with converting the image to 16-bit per channel color. While not always required, I've had problems with banding often enough that I save time in the medium- to long run by always editing in 16-bit.
After that comes a shadow / highlight filter. I do no highlight recovery, since the image is already "exposed to the left", and a little shadow recovery.
|

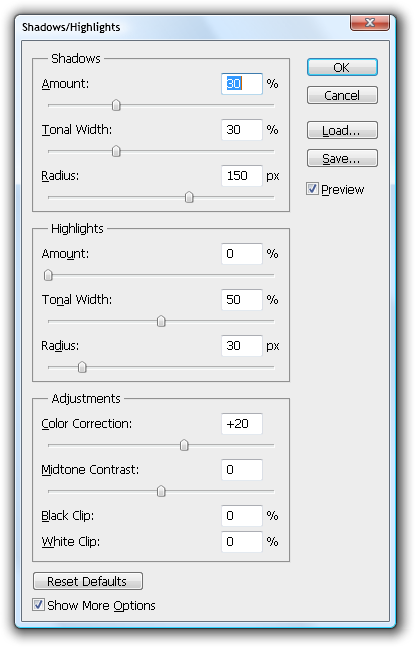

Then another brightening of shadows in preparation for the fourth and last preparation step: a contrast boost. In this article I'm just going to go through the Photoshop layer stack, so these two steps are §10. Shadows and §11. Contrast
All of these steps are stored as a macro in Photoshop. I just load up the original JPEG and press Ctrl+Shift+F7.
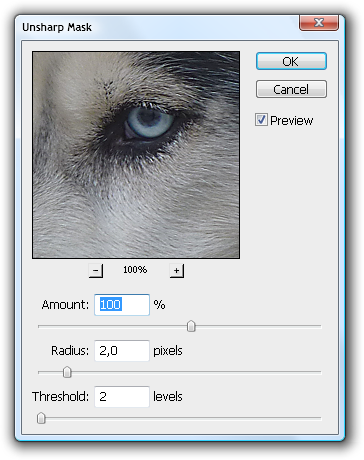
3. Sharpening
I rarely do any extra sharpening in post-processing. Sometimes, however, it might be worth it in order to bring out some fine detail such as the fur around the eye in this example.
| |||||||||||||||


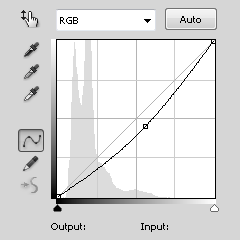
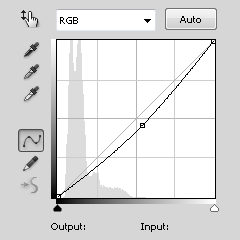
4. Exposure
Most images are not prefectly exposed. I insert a curves or levels layer right above the shadow / highlight layer and tweak it for overall exposure.
|


5. Overall Temperature
The camera gets the white balance right in 99 out of 100 shots, but sometimes you just have to help it a little bit. A Color Balance layer does the job. To redden a bluish image, increase red and yellow in equal amounts; to bluen a reddish image, increase cyan and blue in equal amounts. For serious color-bending I use a curves layer and the "gray point" tool followed by some manual tweaking. In this case I think the color temperature is just fine.
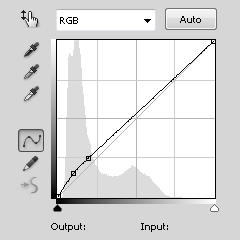
6. Subject
A curves layer with a mask darkens the parts of the image that isn't part of the subject. I usually use a 500px brush to paint the mask, followed by a 250px Gaussian blur.
| |||||||||||||||


7. Focus
A curves layer with a circular gradient mask darkens the parts of the image that isn't part of the focus. I make the gradient cover the whole photo, so there is no spotlight effect.
| |||||||||||||||


8. Direction
Another curves layer with a mask brings out a sense of direction and movement. In this case I'm really stretching it - the dog wasn't moving, and the image doesn't really have a diagonal - but it can be argued that the shape of the head gives the image a little bit of diagonal direction.
| |||||||||||||||


9. Final Brightness
All these curves layers have made the image really dark, so we bring things back to normal by brightening everything. Note that any areas that went untouched by the previous three layers may now end up being very bright. If this is the case, consider easing up on the darkening layers. For this example, I think the result was just fine. Any more brightening would have started to blow out the white parts of the fur.
10. Shadows
Right before adding contrast I add a layer that brightens the shadows a bit.
|

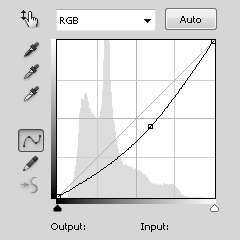
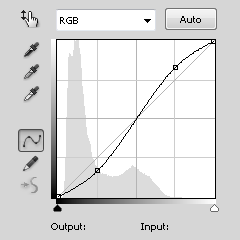
11. Contrast
This is the layer that usually transforms what the image looks like. The S-shaped contrast curve amplifies all the previous adjustments, saturates colors and deepen the blacks.
|

12. Saturation
Increasing contrast also increases the saturation of the image, which can make color appear where there shouldn't be any. In particular, people's skin may appear flustered. A de-saturation layer usually does the trick of bringing things back to normal. For added effect, I mask that layer here, so that the blue eyes remain saturated.
| |||||||||||||||


13. Final Tweaks
There is always space for some extra tweaking. For example:
-
Using the healing brush and the cloning stamp to remove sensor dust.
-
Selective darkening / lightening of areas.
-
Selective white balance changes to emphasize cold / warm areas.
-
Cropping to remove wasted space.
-
Rotating / straightening - very useful for images with grids or other ruler-straight elements.
In fact, one can spend infinite time on post-processing. But I prefer - and I hope you do, too - to go out and capture more images to sitting in front of Photoshop.
14. End Result
Here is a rollover where you can see all post-processing steps.

1:Ori2:S/H3:Sha4:Exp5:Sub6:Foc7:Dir8:Shd9:Con10:Sat
1. Original, 2. Shadow / Highlight, 3. Sharpen, 4. Exposure, 5. Subject, 6. Focus, 7. Direction, 8. Shadows, 9. Contrast, 10. Saturation