360 Video With Blender
This version of Blender is going nowhere fast. Check out the frei0r Plugins for 360 Video if you want to edit video today.
The Ricoh Theta is a fun toy, but to really play with it you need to be able to edit the video you capture. Blender[a] being my favorite tool for this, I decided to try to add some functions I thought were missing to it.
1. Overview
The enhancements consist of three effect strips for the video sequence editor[b]:
Transform 360: An effect strip that rotates a spherical image. Basically, the Transform strip, but for 360 video.
Hemispherical to Equirectangular: An effect strip that stitches two hemispherical images to a spherical image with equirectangular projection. This is what you would use as a first step to process video from the 360 camera.
Rectilinear to Equirectangular: An effect strip that places a rectilinear (normal-looking) image in a spherical image.
Let's look at how these first two of these are used to import and straighten 360 video taken with a Ricoh Theta SC. First, we add the movie to the VSE:
Then, add a Hemispherical to Equirectangular effect strip:
Finally, add a Rotate 360 effect strip...
...and adjust the transform parameters to straighten the image.
Next, let's insert an image taken with a regular DSLR with a 15mm lens. Place the image in the VSE:
Next, convert it to equirectangular using a Rectilinear to Equirectangular effect strip. For a 15mm-equivalent lens, the horizontal field of view is 100 degrees, and the vertical 75 degrees.
2. Getting the Source
The source code is available in the blender-360-video[c] branch over at Bitbucket[d].
3. Parameters
3.1. Transform 360

-
Interpolation: The method used to sample the input image.
-
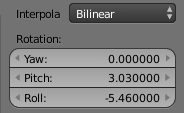
Rotation: These parameters control the transform.
-
Yaw: Rotation around the vertical axis - the center of the image shifts as if you look left or right.
-
Pitch: Rotation around the pitch axis - the center of the image shifts as if you look up or down.
-
Roll: Rotation around the roll axis - the center of the image shifts as if you tilted your head left or right.
-
3.2. Hemispherical to Equirectangular

-
Interpolation: The method used to sample the input image.
-
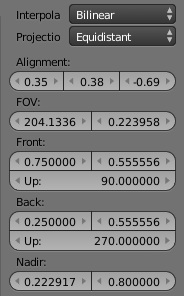
Projection: This sets the kind of fisheye lens[e] that the 360 camera uses. At the moment, the only option is equidistant.
-
Alignment: This controls how the two hemispheres are aligned. Due to manufacturing tolerances, field damage or a myriad other things, the two hemispherical cameras of a 360 camera are rarely perfectly aligned 180 degrees from each other. To find the values here, I find it easiest to open two preview windows (the ones where you see the resulting image), and zoom in one on the left seam, the other on the right seam, and adjust the values until they line up.
-
Yaw: The yaw offset from perfect 180-degrees apart.
-
Pitch: The pitch offset from perfect 180-degrees apart.
-
Roll: The "twist" between the two hemispheres.
-
-
FOV: This sets the field of view of one of the lenses.
-
FOV: The field of view, assumed to be the same horizontally as vertically.
-
Radius: The radius of the image circle, expressed as a fraction of the total image width.
-
-
Front and Back: These control the centers of the hemispheres and their orientation.
-
X: X-coordinate of the center, expressed as a fraction of the total image width.
-
Y: Y-coordinate of the center, expressed as a fraction of the total image height.
-
Up: The direction, measured in degrees clockwise from straight up in the image that the hemisphere's "up" is. For example, if you look at the hemisphere and the sky is to the right, the value should be 90.
-
-
Nadir: Some cameras, like the Theta, has a slight problem with the straight down direction. This lets you use a smaller image circle for the "straight down" direction in order to cut out bits of the camera that may be visible if the full image circle is used in all directions. It is gradually applied to ensure a smooth image warping.
-
Radius: The distance from the center to the edge of the image circle in the image "down" direction, expressed as a fraction of the total image width.
-
Start: The distance from the center of the image circle to the edge where the nadir correction starts to be applied.
-
3.3. Rectilinear to Equirectangular

-
Interpolation: The method used to sample the input image.
-
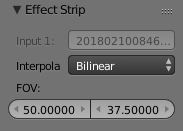
FOV: These parameters control the transform.
-
Horizontal FOV: The horizontal field of view the rectilinear image should occupy.
-
Vertical FOV: The vertical field of view the rectilinear image should occupy.
-
4. Cameras
The effects have been tested with two cameras: Ricoh Theta SC and Garmin VIRB. Due to the processing power required to stitch video, neither produces 360 video straight out of camera, but both can be imported and edited in Blender.
4.1. Ricoh Theta 360
The Ricoh Theta produces a single video stream with the images from the two lenses on the left and right side of the frame.
Just add a Hemisphere-to-Equirectangular effect strip.
4.2. Garmin VIRB 360
The VIRB 360 outputs two movie streams when operating in high-resolution mode. This means we have to pre-process the data a little bit before we can transform it into an equirectangular image. Example images taken from DC Rainmaker[f][1]
First, create a movie with a 2:1 aspect ratio, like 4096 by 2048. Then add the two movies. They will show up horizontally stretched and centered.
Apply a Transform effect strip to the front movie that scales it horizontally by 0.5 and moves it to the right.
Do the same to the back movie, but move it to the left.
Then combine the two streams using an Alpha Over effect.
Finally, convert to equirectangular. Set the front and back centers to 0.75,0.5 and 0.25,0.5, respectively. Since both clips are right side up, the Up value should be 0.0 for both. I don't know what the field of view parameters are for this lens, so you'll have to use trial and error to line up the two hemispheres.
5. Audio
Blender doesn't appear to have any support for spatial audio, and I'm not much of a sound guy, so I have to pass on this topic.
6. Publishing
In order to have your 360 video recognized as 360 video by Facebook or YouTube, you need to add the right metadata to it. Render to MP4, and use Google's Spatial Media Metadata Injector[h] to add the metadata.