Raynox DCR-250
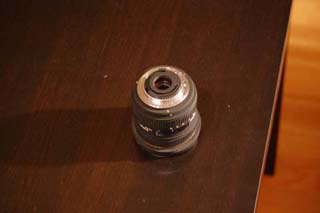
The Raynox DCR-250[a] is an 8-diopter conversion lens that attaches to the filter ring of your lens, enabling close-up macro photography. It is also tons of fun in a small package. After experimenting with the Panasonic TZ7/ZS3 in macro photography, I wanted something that gave a bit more control. The AF tracking mode of the TZ7 did allow me to place focus anywhere in the frame, but the tracking was frequently erratic and would at times refuse to "lock on". Due to the lack of manual controls - especially manual focus - I found macro photography with the TZ7 to be fun, but messy. I also didn't quite like the idea of having to carry two cameras with me. The more I move around, the better the photos, and the more I carry, the less I move.
DCR-250
Close-up lens
- Specifications
- Magnification
- 8-Diopter
- Construction
- 2-group/3-element, Coated optical glass elements
- Front filter thread
- 49mm
- Mounting thread
- 43mm
- Dimensions
- 18mm x 53mm
- Weight
- 60g (2.1oz)
- Flash
- Yes
- Accessories
- UAC2000 Universal adapter
- Lens case
- Lens caps
- Instruction manual
A very cheap and very fun way to get macro capabilities on a DSLR. Excellent for outdoors macro photography. (5/5)
When I looked at macro lenses for my Nikon D40, I told myself that I'd just have to live with the limitations of the TZ7. A Micro-Nikkor costs about $1000, and you still don't get any closer than 0.28 meters! I didn't just want the reproduction ratio of a macro lens, I wanted the close-up focus distance of the TZ7 as well. Through much googling I found out that what I was looking for was a "close-up lens". Nikon used to sell those, but not any more. Then I stumbled into the DCR-250.
The DCR-250 is really tons of fun in a small package. It brings the close focus distance down to about six centimeters in front of the front element on a Nikon 18-55mm, which although twice as far away as the TZ7's close focus distance is close enough. Put it on a Nikon 55-200mm (see below), and you get a reproduction ratio of 1:0.63. All of this for about $100 and in a package so small you can fit it in any camera bag that isn't utterly packed. (In particular, it is smaller than the TZ7 I'd otherwise have to carry.)
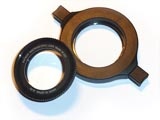
What's not to like about it? Well, the universal adapter it comes with is made of flimsy plastic. One reviewer lamented that it had broken easily. I haven't broken mine yet, but maybe that's just a matter of time. I'll be getting a small plastic case for it, just to be on the safe side.
I have some example shots of a verbena bonariensis on this blog, and below is some attempts at getting some wide-angle macro shots by panoramic stitching[b].
1. Magnification
How macro? Here are sample photos of the rear end of a Sigma 10-20mm lens, taken at the close focus distance. Since the DCR-250 magnifies more the longer the focal length of the lens it is attached to, I only used the Nikon 55-200mm for these comparisons.

| Lens | Focal Length | Original | Magnified | Factor |
|---|---|---|---|---|
| Nikon 18-55mm | 28mm | 791px | 1688px | 2 |
| Nikon 55-200mm | 55mm | 181px | 1284px | 7 |
| Nikon 55-200mm | 200mm | 256px | 2060px | 8 |
Here is another sequence shot with the Nikon 55-200mm:


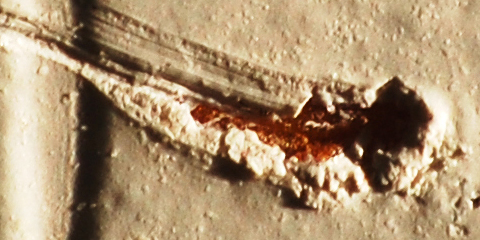
Finally, a 50% crop of some ice crystals from my kitchen window:

2. Example Shots

For more examples of what can be done with the DCR-250, I have collected some shots in the album Raynox DCR-250.
3. Focusing
Even though macro work usually involves manual focusing or fixing the focus and moving the camera or subject, I've found that the auto focus works well for quick and dirty shots. The downside is that magnification changes based on focus distance, so you might end up with a different composition once the auto focus has done its job.
4. Vignetting
Due to the lens attaching to the front of the regular lens, and due to it being 49mm in diameter while the Nikon 18-55 is 52mm across, the DCR-250 completely blocks the view except for a central image circle at the lower focal lengths. Fortunately, once you go above 34mm the vignetting stops. This is therefore only an issue if you shoot panoramas and want to trade wide angle for magnification.


As we can see, at 18mm we're looking out through the tube of the DCR-250 and everything outside the lens is blocked by the universal adapter. At 28mm vignetting is down to a little bit in the far corners where nothing interesting should happen anyway. Note that the corners aren't black - they're underexposed roughly three stops. If you set the lens to focus as close as possible, the Nikon 18-55 extends and we get more vignetting. At 34mm this disappears, and at 55mm the vignetting from the DCR-250 is lost in the vignetting from the 18-55mm.
5. Using
The DCR-250 is very well suited for people like me who do most, if not all, of their photography outside of a studio. The small size of the lens makes it easy to bring along when hiking, and the fact that it can be used with both the 18-55mm and 55-200mm enables it to be used in many different situations. Instead of carrying a dedicated macro prime (typically 100mm) in addition to my existing set of lenses, I get macro capabilities for all of them. This saves one lens slot in the camera bag and is a real big win for me.
While out shooting I have tried to use a macro focusing rail. I realized that such things come with two problems: They take time setting up, and they don't solve the problem of subject motion, which for outdoor photography is just as big a problem as camera motion. Therefore I usually can't be bothered with the hassle and end up shooting hand held. When shooting hand held with a macro lens the problems of hand held shooting multiply:
-
The camera and subject must be held much steadier than in normal photography. If the image moves more than one sensor-pixel during exposure, the result will be blurry. Since the sensor pixels are measured in micrometers, and we can have a reproduction ratio of 1:0.63, you may end up with a blurry photo if anything moves more than a micrometer during exposure. A fast shutter can help, but as we'll see below, you hardly ever get that luxury.
-
The short distance to the subject means that blur from camera shake isn't just caused by rotation of the camera, an equally large contribution is made by camera movement.
-
The short distance also makes subject movement an issue. Suddenly it isn't just the camera that needs to be still - the subject had better not move either!
-
The limited depth of field makes small apertures a necessity. I frequently shoot at f/18 just to get enough of the subject in focus. With such small apertures, you end up with a very slow shutter speed, which again makes it more likely that the photo will come out blurry.
My solution to this is to take 30-40 shots and pick the sharpest one. Mind you, of those 40, about twenty will have the composition wrong as some gust of wind rearranged the scene, ten will be completely out of focus and nine will have some form of camera shake in them.
All in all however, these issues have more to do with outdoors macro photography in general than with the DCR-250 or close-up lenses. The DCR-250 is really a joy to bring when hiking: Takes little to no space when not used, doesn't force me to leave anything else back home, and thanks to working on multiple zoom lenses at almost all focal lengths gives an amazingly wide creative gamut.
6. Panoramas With Nodal Ninja
The settings are quite simple: The DCR-250 doesn't move the entrance pupil[c], so just decide on a focal length and lens, and use the usual settings. I use the Nikon 18-55mm at 28mm, so I used the settings for 24mm, slightly tweaked. Using the same parameters as the "Camera and lens settings for Nodal Ninja tripod heads"[d] web page, my values are A = 50mm, B ~= 94.5-95.0mm. I use the 15° rotation plate, which is just about perfect. The vertical field of view (since the camera is mounted at 90 degrees, that's along the long side of the sensor) is approximately 30°, and the horizontal is 20°. This gives a 5°, or 25% overlap. I've found it sufficient so far. Mounting the camera on a tripod is done thusly:
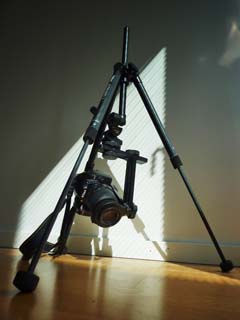
The way the camera hangs in the photo above (with the shutter button below the lens when the lens is pointing at the horizon), I can rotate the camera all the way from straight down to straight up. Due to the bulk of the grip, though, I must swing it around so that the grip is above the camera if I want to get really close to the ground. The tripod is then aimed so that the region of interest is between the two tripod legs to the left and right of the camera.

A couple of pointers when shooting panoramas this way:
-
At this level of magnification, and these short distances, even a very slight movement of the camera matters a lot. Therefore, make sure the camera sits firmly attached to the Nodal Ninja, that the NN is attached to the tripod firmly, and that the tripod itself is stable. In particular, make sure the knobs are tight. This should perhaps go without saying, but I've shot a lot of panoramas, and I was surprised how much "slack" there was in the system when I tried to do the macro panorama.
-
Use the timed shutter release. Unless your tripod is super-steady (mine isn't, I bought it for mobility), you will move the camera ever so slightly when pressing the shutter button. Using a 2s timer avoids this.
-
Beware of wind if you are photographing something that sways. Even a slight wind can cause straws of grass to move all the way across the frame, making it impossible to assemble the panorama.
-
Beware of defocused areas. It is next to impossible to set the control points for stitching the panorama if all detail is lost in a blur. This is problematic when you want a bit of "filler" at the edges of the photo, and realize that you'll never be able to correctly position those parts of the panorama. On the other hand, the more blur, the less opportunity to find any misalignment flaws.

The first attempt at a panorama using the Raynox DCR-250, Nikon D40, Nikon 18-55mm VR II and Nodal Ninja 3. The field of view is roughly 76 degrees horizontal and 68 degrees vertical, which makes it approximately equivalent to a theoretical 12mm macro lens that is cropped horizontally. For comparison, at 28mm the Nikon 18-55mm covers a 52x36 degree field of view. The boredom of the subject is, for me at least, offset by the excitement of actually being able to create it.
2010-09-02 11:44

The second attempt at a panorama. Same equipment as the first. This time the field of view was 64 by 42 degrees, approximately equivalent to a theoretical 18mm macro lens, and made from three separate exposures (left-center-right).
2010-09-02 17:37
7. Mathematics
While researching macro conversion lenses I came across this summary of the mathematics behind them. In the text, "CU" means "Close-Up lens", that is, macro conversion lens, and "FL" refers to the lens's Focal Length:
Diopters are the optical strength of the CU lens. Its focal length can be calculated by using FL = 1000/Diopters. This is also the distance that will now be in focus when the lens is focused at infinity. (A +2 diopter will bring a subject at 1/2 metre (500mm) away into focus.)
To estimate minimum focus distance convert the camera lens minimum distance to diopters and add it to the CU lens strength. So a +2 CU lens used with a lens that focuses to 1 metre will act (approximately) like a +3 CU lens and bring a subject at 1/3 metre into focus.
Another approach is to calculate magnification. Convert the diopter strength to millimeters focal length (CU FL = 1000/Diopters). Then divide the camera lens FL by the CU lens FL to get the magnification when the lens is focused at infinity. Thus a +2 CU is 500mm FL. If you use it on a 50mm lens you will get 1:10 life size. The same +2 on a 300mm lens will give you 0.6 of lifesize (1:1.66).
Below are my calculations for Nikon 18-55mm and 55-200mm lenses with a Raynox DCR-250. I haven't verified them experimentally, and to be honest, I was so unsure of just what they meant in terms of getting a good photo that they were more of a mathematical exercise than research. Ultimately I looked at photos taken with the DCR-250, decided that they sure looked good, and bought one based on that. I publish the numbers and tables here in the hope that someone will find them useful.
7.1. Lens Data
This is without the conversion lens attached.
| Lens | Near Focus Distance | Strength |
|---|---|---|
| Nikon 18-55mm | 0.28 m | 3.571 dptr |
| Nikon 55-200mm | 1.1 m | 0.909 dptr |
7.2. Focus Distances
These are the near and far focus distances of the lenses with a DCR-250 attached. Since the math assumes that the lens is infinitely thin, the distance is not the distance from the front element, but rather from the nodal point[f] of the lens.
| Lens | Near | Far | Span |
|---|---|---|---|
| Nikon 18-55mm | 8.6 cm | 12.5 cm | 3.9 cm |
| Nikon 55-200mm | 11.2 cm | 12.5 cm | 1.3 cm |
7.3. Reproduction Ratios
Finally, the theoretical reproduction ratios. The focal length of the DCR-250 is 125mm (1000mm / 8 diopters).
| Lens | Focal Length | Ratio |
|---|---|---|
| Nikon 18-55mm | 18 mm | 1:6.94 |
| Nikon 18-55mm | 28 mm | 1:4.46 |
| Nikon 18-55mm | 34 mm | 1:3.68 |
| Nikon 18-55mm | 55 mm | 1:2.27 |
| Nikon 55-200mm | 125 mm | 1:1.00 |
| Nikon 55-200mm | 200 mm | 1:0.63 |
Links
http://www.raynox.co.jp/english/dcr/dcr250/indexdcr250eg.htm | |
https://monochrome.sutic.nu/2010/09/02/raynox-dcr-250.html#panoramas | |
http://en.wikipedia.org/wiki/Entrance_pupil | |
http://nodalninja.com/support/camerasettings.html | |
http://www.angelfire.com/ca/erker/closeups.html | |
http://en.wikipedia.org/wiki/Cardinal_point_(optics)#Nodal_points |