When I set out to assemble the six thousand or so photos that would make up Sunset Over Jezreel Valley into a movie clip, it quickly became apparent that my movie post-processing toolchain wasn't quite up to it. In particular, there were two problems: Correctly assembling the photos into a timeline from which a timelapse could be made, and compensating for the abrupt changes in exposure the camera does as the light changes.
1. Timeline Creation
The timelapse timeline creation, as detailed in the Cheap and Lean Timelapse Machine article didn't properly compensate for the in-camera post-processing step done by the Panasonic DMC-TZ7. When exposure times exceed one second, the camera will break up the exposure into several one-second exposures and then combine those into a final image. The combination step took about the same time as the exposure, and therefore, as soon as the sun had set, the timelapse appeared to speed up by a factor of two, as the program wouldn't properly compute the inter-frame timing.
This turned out to be a simple problem to fix. I changed the code to simply double any exposure times over one second. That way, I got the in-camera post-processing correctly accounted for.
2. Exposure Correction
The exposure correction, as described in the Timelapse Exposure Correction article, didn't handle highlights very well. As my timelapses hadn't involved the sun before, this had never been an issue, but now it became apparent when the sun turned gray. A sample image shows the problem - the left half is uncorrected, the right half corrected:
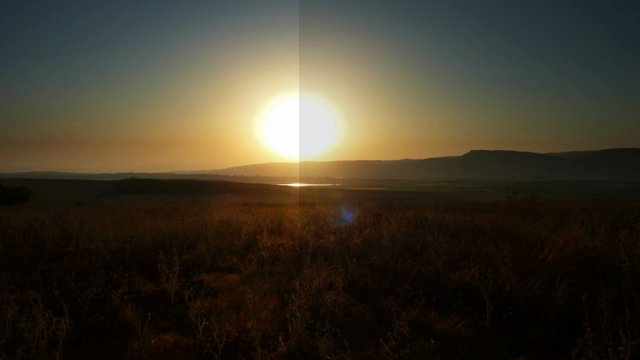
The problem originates in how the exposure correction is done: Once we have computed the target average red, green and blue intensities in the image, we simply multiply the image's channels with the appropriate values in order to get the right averages. The problem comes when you have clipped highlights - like the solar disk in the example. In reality, the sun is much brighter than the darkest light intensity that will render as white in a photo. Therefore, the solar disk is much, much larger in the photo than it appears in real life. But this "excess" light intensity isn't recorded anywhere in the image.
When the correction algorithm then decides that the photo is too bright and needs to be darkened, it will take the RGB values of the solar disk, [1.0 1.0 1.0][1], and simply reduce them to, say [0.9 0.9 0.9]. This takes care of the exposure, as far as the algorithm is concerned - the average RGB intensities in the image are now equal to the desired target intensities. But for us, who knows what should happen - the disk should remain bright white, it should just be smaller - it looks very wrong.
The solution required three different parts:
-
The highlights had to be boosted to approximately [1.3 1.3 1.3]. That way, when the exposure was altered, they would still be at or near [1.0 1.0 1.0]. This took care of the problem of the "gray sun". I did this by multiplying any intensities over a fixed threshold (0.9, as it were) by a constant factor (1.3). That is[2]:
x = grayIntensity (r, g, b); if (x < threshold) { f = 1 + ((x - threshold) / threshold) * factor; r = r * f; g = g * f; b = b * f; } -
The average RGB intensities should only be computed from pixels whose intensity lies in the range [0.1 - 0.9]. Simply put, the big solar disk made a mess of computing the average. When the camera changes exposure - mostly to a longer exposure - the solar disk would jump in size. That jump added so many full-intensity pixels to the image that the 50-frame rolling window was unable to smooth out the transition. By restricting the sampling to the image area outside the highlights this was averted.
-
Despite the two changes above, the solar disk would still jump abruptly in size. This was the one issue that couldn't be solved by individual image manipulation. Instead, I stacked six copies of the resulting movie, each offset by one frame to the previous one, and averaged the frames. This had the effect of blurring any movement in the movie, and with that, reduced the visual impact of the change in sun size.
Footnotes
[1] | Channel intensities are represented in 32-bit floating point. When an image is saved, they are clipped to [0.0 1.0], but during processing the intensitites can go outside that range and even turn negative. |
[2] | I hereby show this code without any further comment, because I don't really know what it does. When I came up with it, I just thought that "it ought to look something like this", and I didn't actually check that it did what I thought it did. I put it in and ran the timelapse creation, and since it worked in the sense that it produced pleasing output, I had no motivation to prove it correct or understand it further. |